


sedruck Photo World
In our photo world you’ll find everything to make your pictures shine: photo books, high-quality photo prints, and more.
There are several ways to create your book cover:
1. The title page, i.e. the first page of your main document, is simply printed on the front cover.
2. Use our online cover designer
3. Create the cover yourself (with Word, InDesign, etc.)
4. Terminology for creating a cover
In the cover options, select the cover print. In the cart, click on the button “Upload PDFs”. Further down in the “Cover print” section, select “First page of the document”. You can then choose whether the title page should also be printed again as the first page inside the document.
You can use our online cover designer to create your cover. It is available to you during the ordering process.
The online cover designer is integrated into the following products:
Hardcover bindings:
Softcover bindings:
Other:
As an alternative to the online designer, you can also use Word, InDesign, etc. The prerequisite is that your document can be saved as a PDF. You can then upload the PDF file in the cart.
You can find instructions on how to create covers for perfect binding, hardcover binding or a dust jacket here:
Do you want to create a cover for perfect binding? Then click here.
If you want to create a cover with images bleeding to the edge that should not contain “white edges”, a bleed of 2 mm is required. If you want to design one of the products listed above, you can have the dimensions for your individual cover calculated directly. To do this, go to the respective product page, enter the desired parameters and select the cover print option. The appropriate dimensions will then be displayed on the left side of the page.
You may then need to add the 2 mm bleed on each side to these dimensions. If you do not have any images or colored elements that extend all the way to the edge of your book, a bleed is not necessary.

Example: A4 wire-o binding in portrait format with images bleeding to the edge and bound on the long side
We want a cover print on the front, outside (U1). The dimensions displayed on the right are 297x210 mm (A4). We must add a bleed of 2 mm twice to the height and also twice to the width. The dimensions of our cover are therefore 301x214 mm.
Do you want to create a cover for hardcover binding or the handcrafted book? Then click here.
The exact dimensions for your hardcover product can be found on the respective product page, provided the desired product is listed above under hardcover bindings. Simply enter the desired parameters and select the cover print option.
The bleed of 20 mm is included here and is always required. In this case, the bleed is not trimmed but folded over.
If images should not have a white border, it is also recommended here to extend them into the bleed area, i.e. all the way to the edge.

Example: A4 hardcover ring binding in portrait format full bleed and bound on the long side
We want a cover print on the front outside (U1) and the back outside (U2). We go to the product page of the hardcover ring binding and read the dimensions there after selecting all parameters and the cover print. The cover is slightly larger than A4 from the outset (as it is meant to protect the contents), resulting in the following dimensions:
The cover height is calculated from the book board height (300 mm) plus twice the bleed (2x20 mm). The book board width (212.5 mm) plus twice the bleed (2x20 mm) results in the cover width.
The cover dimensions are therefore 340x252.5 mm. The final format of the cover is 300x212.5 mm.
The bleed is important when images are to be printed edge-to-edge or “full bleed” on the cover. For this, the images must extend beyond the final format. This prevents white edges (“white edges”) from appearing. To allow images to extend beyond the final format, a bleed must be added on each side.
For hardcover bindings, the bleed is not trimmed but folded around the book board.
Book cover with bleed
Book cover after trimming
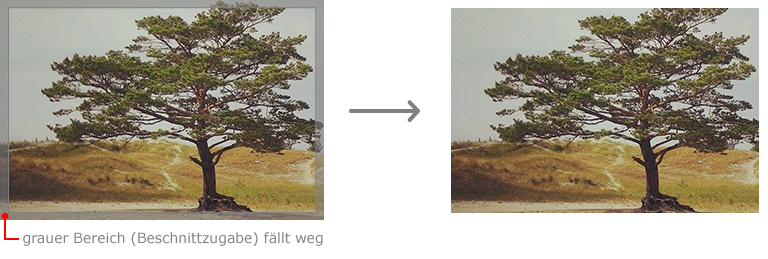
The final format refers to the final size of a document after it has been printed and trimmed. The final format no longer includes any bleed.
White edges are usually white, unprinted areas at the edge of a document. They occur when no bleed has been added.
The crease is a vertical indentation located where the book cover meets the spine. In hardcover books, the crease is also called the “hinge”.

If you want to design a book like in the image above, it is necessary to place the image into the bleed area, i.e. all the way to the edge of the document.

This ensures that the images do not have a white border.